autonumber
header 页眉
footer 第 %page% 页,共 %lastpage% 页
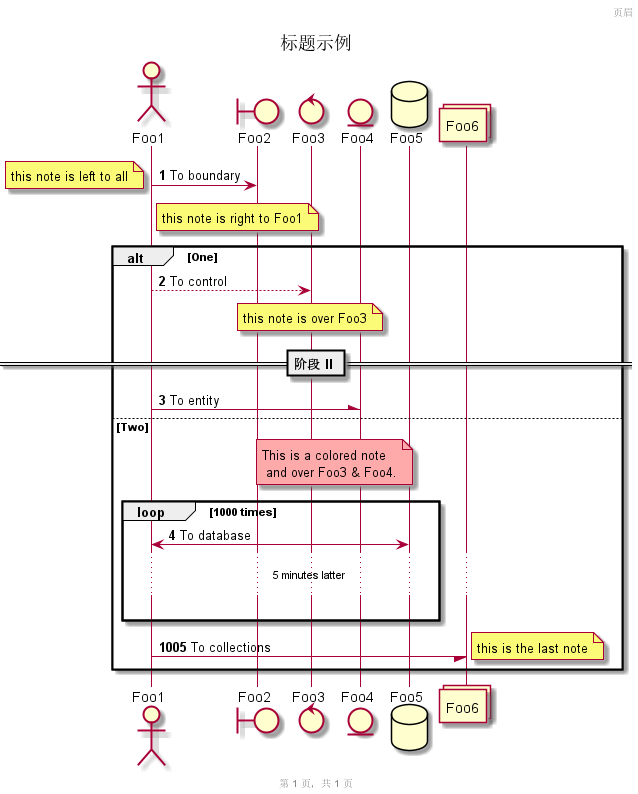
title 标题示例
actor Foo1
boundary Foo2
control Foo3
entity Foo4
database Foo5
collections Foo6
Foo1 -> Foo2 : To boundary
note left: this note is left to all
note right of Foo1: this note is right to Foo1
alt One
Foo1 --> Foo3 : To control
note over Foo3: this note is over Foo3
== 阶段 II ==
Foo1 -\ Foo4 : To entity
else Two
note over Foo3, Foo4 #FFAAAA: This is a colored note\n and over Foo3 & Foo4.
loop 1000 times
Foo1 <-> Foo5 : To database
...5 minutes latter...
|||
autonumber 1005
end
Foo1 -/ Foo6 : To collections
note right: this is the last note
end
注解:
autonumber 用来给消息序列自动编号,autonumber N 用于指定起始编号为 N,autonumber N x 指定起始编号 N 与增量 x。用 autonumber stop/resume 来暂停/继续编号。
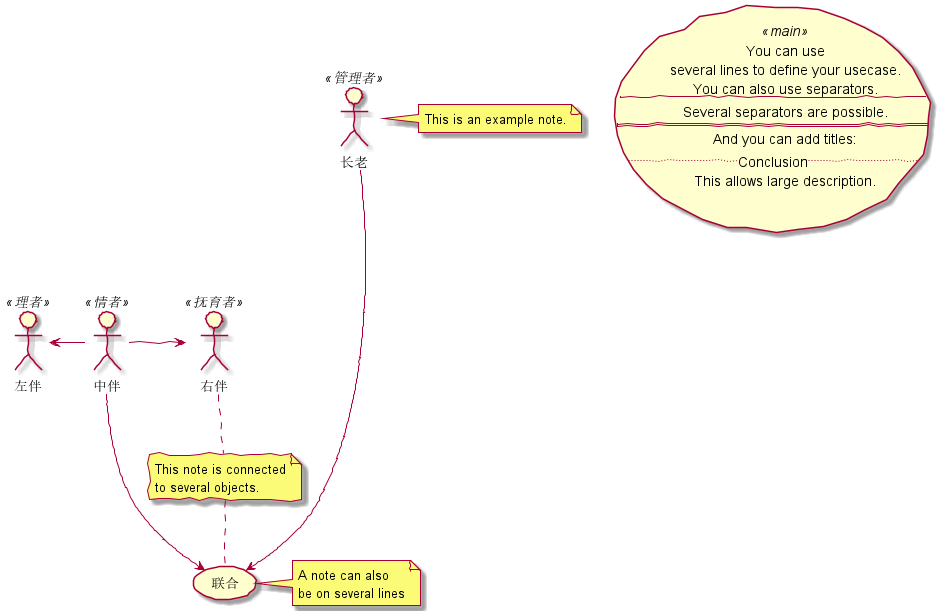
skinparam handwritten true
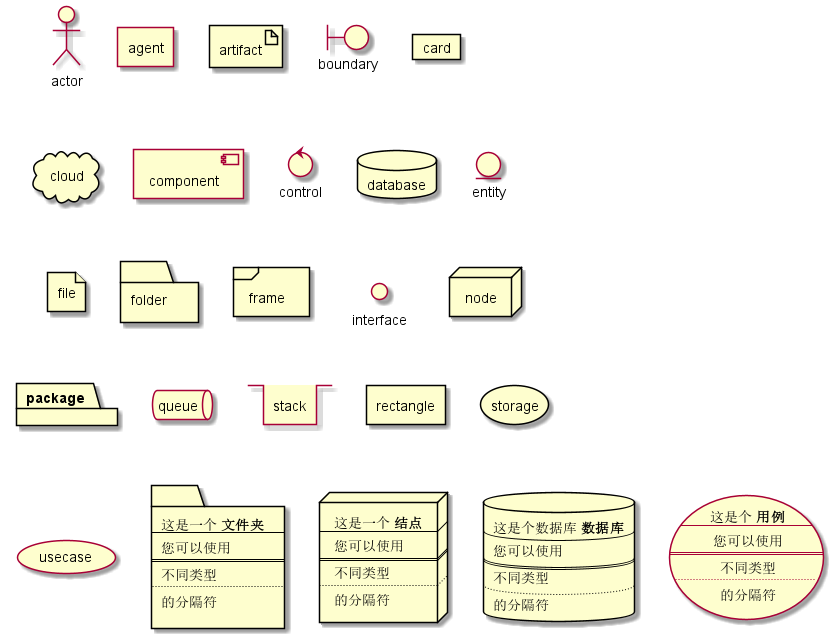
:长老: as E <<管理者>>
:中伴: as M <<情者>>
:左伴: as L <<理者>>
:右伴: as R <<抚育者>>
usecase Use <<main>> as "You can use
several lines to define your usecase.
You can also use separators.
--
Several separators are possible.
==
And you can add titles:
..Conclusion..
This allows large description."
M -> R
M -left-> L
M --> (联合)
E ----> (联合)
note right of E : This is an example note.
note right of (联合)
A note can also
be on several lines
end note
note "This note is connected\nto several objects." as N2
R .. N2
N2 .. (联合)
注解:
用例用圆括号括起来,也可以用关键字 usecase 来定义用例。还可以用关键字 as 定义一个别名。
角色用两个冒号包裹起来,也可以用 actor 关键字来定义角色。还可以用关键字 as 来定义一个别名。
start
:ClickServlet.handleRequest();
:new page;
if (Page.onSecurityCheck) then (true)
:Page.onInit();
if (isForward?) then (no)
:Process controls;
if (continue processing?) then (no)
stop
endif
if (isPost?) then (yes)
:Page.onPost();
else (no)
:Page.onGet();
endif
:Page.onRender();
endif
else (false)
endif
if (do redirect?) then (yes)
:redirect process;
else
if (do forward?) then (yes)
:Forward request;
else (no)
:Render page template;
endif
endif
end
package"Some Group"{HTTP-[FirstComponent][AnotherComponent]}node"Other Groups"{FTP-[SecondComponent][FirstComponent]-->FTP}cloud{[Example1]}database"MySql"{folder"This is my folder"{[Folder3]}frame"Foo"{[Frame4]}}[AnotherComponent]-->[Example1][Example1]-->[Folder3][Folder3]-->[Frame4]
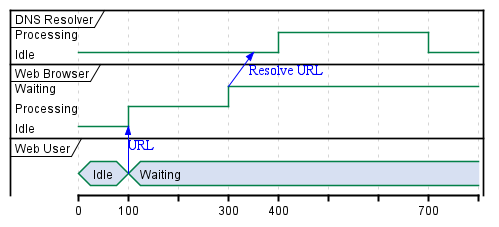
robust "DNS Resolver" as DNS
robust "Web Browser" as WB
concise "Web User" as WU
@0
WU is Idle
WB is Idle
DNS is Idle
@+100
WU -> WB : URL
WU is Waiting
WB is Processing
@+200
WB is Waiting
WB -> DNS@+50 : Resolve URL
@+100
DNS is Processing
@+300
DNS is Idle
sprite $bProcess jar:archimate/business-process
sprite $aService jar:archimate/application-service
sprite $aComponent jar:archimate/application-component
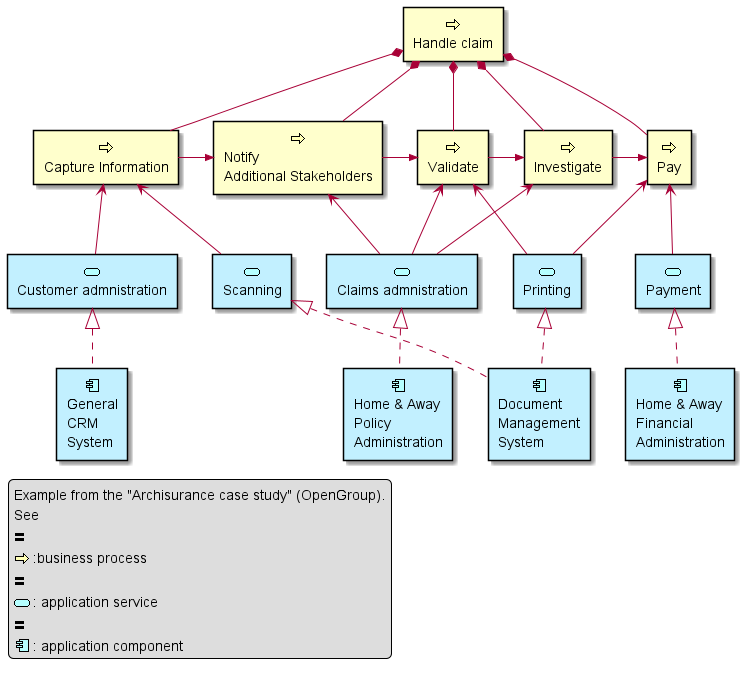
archimate #Business "Handle claim" as HC <<business-process>>
archimate #Business "Capture Information" as CI <<business-process>>
archimate #Business "Notify\nAdditional Stakeholders" as NAS <<business-process>>
archimate #Business "Validate" as V <<business-process>>
archimate #Business "Investigate" as I <<business-process>>
archimate #Business "Pay" as P <<business-process>>
HC *-down- CI
HC *-down- NAS
HC *-down- V
HC *-down- I
HC *-down- P
CI -right->> NAS
NAS -right->> V
V -right->> I
I -right->> P
archimate #APPLICATION "Scanning" as scanning <<application-service>>
archimate #APPLICATION "Customer admnistration" as customerAdministration <<application-service>>
archimate #APPLICATION "Claims admnistration" as claimsAdministration <<application-service>>
archimate #APPLICATION Printing <<application-service>>
archimate #APPLICATION Payment <<application-service>>
scanning -up-> CI
customerAdministration -up-> CI
claimsAdministration -up-> NAS
claimsAdministration -up-> V
claimsAdministration -up-> I
Payment -up-> P
Printing -up-> V
Printing -up-> P
archimate #APPLICATION "Document\nManagement\nSystem" as DMS <<application-component>>
archimate #APPLICATION "General\nCRM\nSystem" as CRM <<application-component>>
archimate #APPLICATION "Home & Away\nPolicy\nAdministration" as HAPA <<application-component>>
archimate #APPLICATION "Home & Away\nFinancial\nAdministration" as HFPA <<application-component>>
DMS .up.|> scanning
DMS .up.|> Printing
CRM .up.|> customerAdministration
HAPA .up.|> claimsAdministration
HFPA .up.|> Payment
legend left
Example from the "Archisurance case study" (OpenGroup).
See
==
<$bProcess> :business process
==
<$aService> : application service
==
<$aComponent> : application component
endlegend
注释:
用 archmate 关键词定义元素。
用 circle 关键词定义连接。
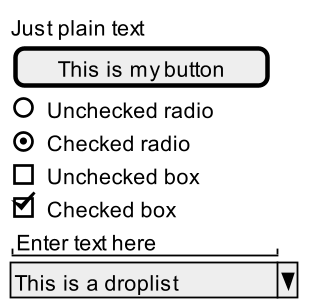
线框图
1
2
3
4
5
6
7
8
9
10
11
12
13
@startsalt
scale 1.8
{
        Just plain text
        [This is my button]
        ()  Unchecked radio
        (X) Checked radio
        []  Unchecked box
        [X] Checked box
        "Enter text here   "
        ^This is a droplist^
}
@endsalt
@startgantt
scale 1.8
Project starts the 20th of September 2019
Sunday are closed
2019/10/1 to 2019/10/3 is closed
[模型设计] as [P] lasts 13 days and is colored in Lavender/LightBlue
[里程碑] happens at [P]'s end
[模型测试] lasts 9 days and is colored in Coral/Green and starts 3 days after [P]'s end
[编写测试] lasts 5 days and ends at [P]'s end
[雇佣人员] lasts 6 days and ends at [编写测试]'s start
[编写报告] is colored in Coral/Green
[编写报告] starts 1 day before [模型测试]'s start and ends at [模型测试]'s end
@endgantt
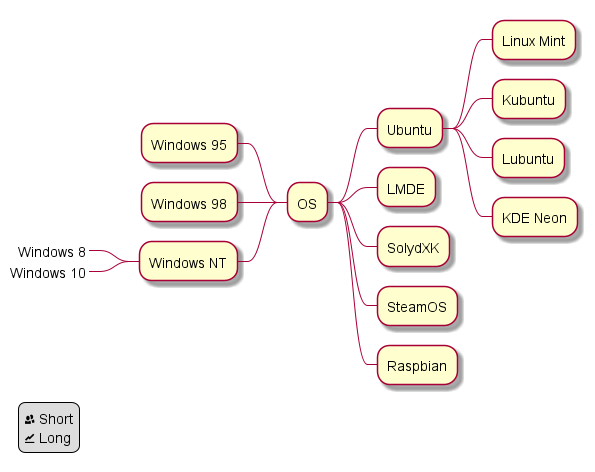
@startmindmap
+ OS
++ Ubuntu
+++ Linux Mint
+++ Kubuntu
+++ Lubuntu
+++ KDE Neon
++ LMDE
++ SolydXK
++ SteamOS
++ Raspbian
-- Windows 95
-- Windows 98
-- Windows NT
---_ Windows 8
---_ Windows 10

legend left
        <&people> Short
        <&graph> Long
endlegend
@endmindmap